Another quick practice study.
I’ve been enjoying fitting these small studies into my sculpting sessions lately. Spent around 30 minutes on this one sculpting a posed hand.
Mitchell Russell
3D Character Artist | Wushu Studios
Fundamentals Practice | Anatomy Studies 04
Work In Progress / 10 March 2026

Fundamentals Practice | Anatomy Studies 03
Work In Progress / 04 March 2026
Here's an anatomy practice study that ended up turning into Batman 😄
I was originally planning to just focus on the torso, but I’ve been super into the Absolute Batman comics lately and I think some of that influence definitely crept in 😅
Really enjoyed spending a little bit longer on this one and getting lost in the sculpt for a while.


Fundamentals Practice | Anatomy Studies 02
Work In Progress / 25 February 2026
Completed a 20 minute ear study and off the back of that I wanted to explore some ideas I had for my Witcher 3 Redanian Guard character, one of those being a cauliflower ear.
I took the base sculpt and spent another short session experimenting with the forms, looking into how cartilage trauma can affect the structure and internal anatomy of the ear.
Ear 20 mins

Further study: Cauliflower Ear

Fundamentals Practice | Anatomy Studies 01
Work In Progress / 23 February 2026
I’ve been making some time lately to do some small speed sculpts, super simple studies just to practice the basics.
It’s been really good to take a little time away from grinding away at longer projects and find the enjoyment again in these quick challenges. The main focus has been not being too precious with them, not over refining, not worrying if they look great, and just stopping when the timer ends and sharing the result.
I’ve been trying to start each sculpting session with a quick study. These two were done on different days, 20 minutes each.
I’ve got a few more from the past few weeks that I’ll share soon once I have the time to grab some screenshots.
Nose 20 mins

Eye 20 mins

The making of: Warhammer 40k Leviathan Dreadnought #3
Work In Progress / 19 May 2022
Here I will post a thread of progression renders and the development that has gone into my Fan Art project of making a Game Ready Death Guard Leviathan Dreadnought.
Any feedback/ways to improve is welcome and greatly appreciated.
Throughout I shall include my own personal comments and observations detailing my intentions and direction for the piece. This shall be in the form of annotations.
Continuing Development


Final High Poly


Material Set-Up, Low Poly and UV Maps


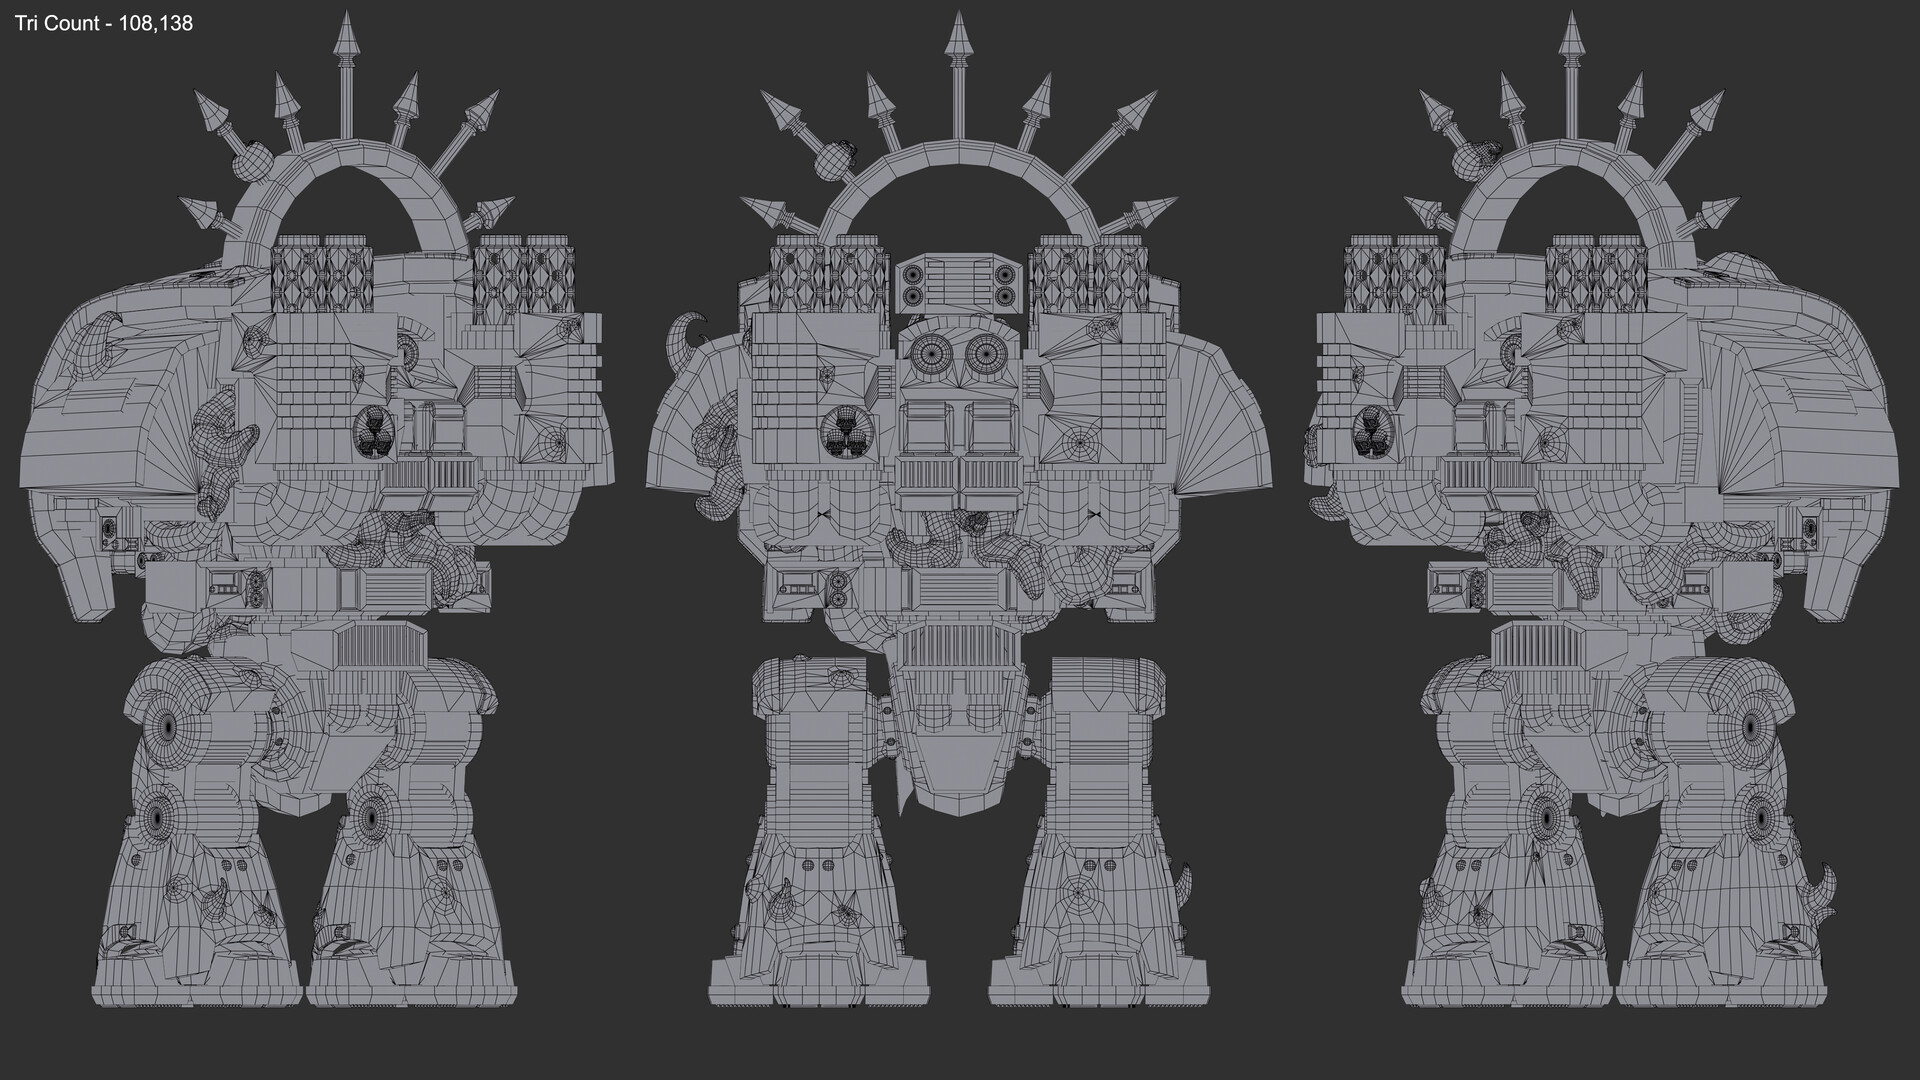


I have tried to optimise the low poly as much as possible. Some areas can definitely be improved, I was being somewhat cautious in regards to maintaining the silhouette across the model. The model itself is fairly complex and in wanting to retain a clean silhouette I let some areas be a higher tri count. More than what they probably needed to be. A lot of the areas that I decided should have more topology were the cylindrical shapes that were prominent/more visible. Allowing the extra topology to support the bake gave a nice clean result which I think the model has benefitted from.


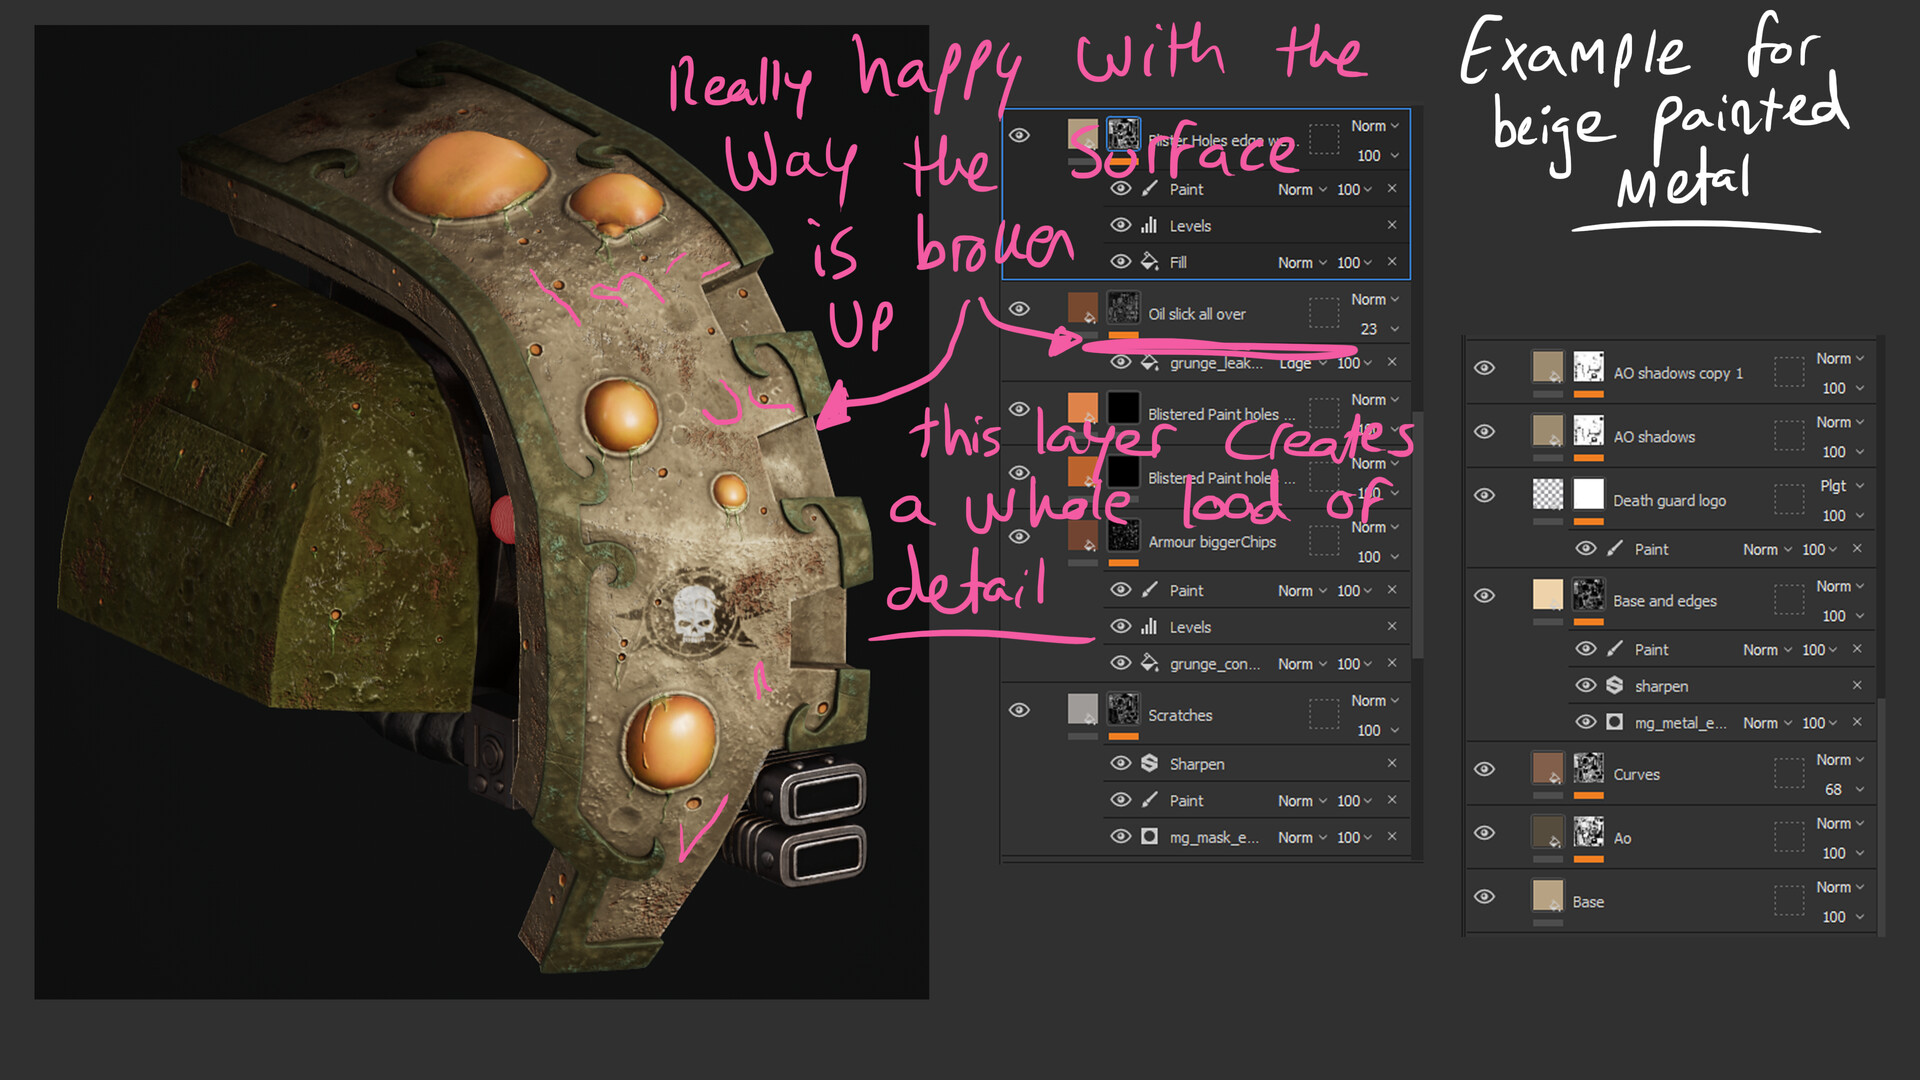
Texture Development


Iray Renders


At this point of the Dreadnoughts journey I was happy with the textures and the detail that I have tried to implement through each stage, I felt, was consistent with one another. Pushing it closer to the realism that I was aiming for. There are areas I feel this does lack or a drop in the consistency does happen. Refinement in these areas with the created materials should help improve these issues.
Next, I will post up the posing of the model as well as the progression to getting it into Unreal Engine 4, setting up my scene and creating my VFX to go along with this character. The VFX section of this project is a new area of exploration for me. I will break down my process and what I have explored with my results in tandem with the final Leviathan Dreadnought.
The making of: Warhammer 40k Leviathan Dreadnought #2
Work In Progress / 04 April 2022
Here I will post a thread of progression renders and the development that has gone into my Fan Art project of making a Game Ready Death Guard Leviathan Dreadnought.
Any feedback/ways to improve is welcome and greatly appreciated.
Throughout I shall include my own personal comments and observations detailing my intentions and direction for the piece. This shall be in the form of annotations.
Workflow

 Above is the super quick workflow I used to create a piece of cloth inside of Marvelous Designer taken through to Zbrush for clean up. I will then take this and start sculpting some surface detail, adding tears and holes to suit the style I am aiming for.
I wanted to have some torn cloth hanging from the Dreadnought. A lot of minis have this element, I think it'd work really well for my model.
Continuing Development


 Here are some development shots of the mech with mostly all of the chaos elements added. I have been cautious with not adding crazy amounts all over the model. My aim was to create a balance between the two yet keeping the Chaos prominent, just making sure it isn't overbearing.
With the base model having quite a lot of detail around the back I wanted not overdo it it here. To blend around the model I added more blisters and spikes in areas in an attempt to create a visual balance as you look around the mech. I think adding the three skulls on the back of the mech works really well, matching one of the Death Guard symbols. This just needs a mesh adding behind it so it isn't just floating.
I am planning on adding more tentacles. I have added more around the back but I like the idea of some coming from the vents. Incorporating it more with the model itself, I feel this makes the design more cohesive when visually it is interacting with itself. A later plan is to use World Position Offset to make these wriggle and move inside of Unreal.
 Wanted to create a milestone render and bring the guns into the scene. Having a look at what the model looks like as a whole. So far I think it's looking pretty cool. Still a lot of work to do where tertiary details are concerned. Areas like the back and the cloth at the front still need some work. The guns need the chaos elements adding. I don't think these will be as detailed, just enough to blend to make a cohesive model.


 Here is a final version of the torn cloth. It is still very much a work in progress as there are elements needing to be developed.
This was a first time for me in creating a detailed torn cloth effect in Zbrush. A lot of it was experimentation and doing some tests to see what works and looks the best. I settled on this small workflow on how I would approach the model. As noted in my annotations, some areas further away are to dense and need to be blended with the rest of the model.
 I have now added the additional tentacles. Looking closer, the vents are bending around model to have more of a believable look. I have also included some closer up shots of the detail that has been added to the tentacles. This is still a work in progress as I feel more can be added to emphasise the gross look of the tentacles, pushing it closer to the Nurgle aesthetic.
After, the plan is to continue and finish optimising the low poly as this has been a slow burn whilst finishing up the high poly. Further surface detail is going to be added to the model to help push the plague and chaos that has inflicted the mech. More documentation of this will follow in my third blog post.
The making of: Warhammer 40k Leviathan Dreadnought #1
Work In Progress / 22 March 2022
Here I will post a thread of progression renders and the development that has gone into my Fan Art project of making a Game Ready Death Guard Leviathan Dreadnought.
Any feedback/ways to improve is welcome and greatly appreciated.
Throughout I shall include my own personal comments and observations detailing my intentions and direction for the piece. This shall be in the form of annotations.


First set of images showing roughly the early stages of where I am at with the project. Further iteration and development is being made on increasing the level of detail in the high poly as well as further optimisation for the low poly. Utilising Zremesher and 'Polygroup by Normals' I am able to maintain the silhouette but keep the topology clean for sculpting. With a little bit of extra clean up after this method has proven to be efficient on achieving base needed. The images following shall show this method more clearly.
Workflow


This workflow will be carried throughout the whole of the mech to ensure a nice clean, not too hard, edge. This may have to be tweaked piece by piece but following this as a general guideline works well. This exact same process will be applied to the Storm Cannons that sit on either side of the mech.
Continuing Development


Seeing some noticeable errors with the proportion of the feet I went back to 3DS Max to alter the model. Having defined the workflow and having done it for the whole mech already it was super quick to repeat the process.


The Storm Cannons have seen a huge change in the amount of detail as well changes in proportion. The next step to this is to get it inside of Zbrush and to repeat the same workflow used on the body of the mech. Having this extra detail will now give me more options inside of Zbrush.
Although, keeping in mind that I still need to optimise the low poly as a lot of this extra detail, like the bullets, could just be baked down. Similarly, this approach is being taken with the mech to drop the polycount, making it more game ready.
Adding Chaos Elements
Rather than just making a stock Leviathan Dreadnought I saw an opportunity to push the model a little further and being obsessed currently with all of the conversions I have seen social media. My plan is create a Death Guard Dreadnought and have all of the cool and gross Nurgle themed elements.
Standard Leviathan

Chaos Inspiration


Continuing Development


 I wanted the design to be striking and suit the Dreadnoughts style. I like the idea of having a huge unique scratch down the middle to add some story to the model. The Leviathans being quite rare and quite old within the universe I wanted the battle scars be quite prominent. The idea behind this was as if a Tyranid had lunged and scratched at the Dreadnought.
At the beginning I really struggled with the helmet. Trying to find a design that I liked was really tough. Above there is a comparison accompanied by some notes that I made on the current design. Testing and placing the helmet into the mech was one of the main mistakes I made at first. At the time I was spinning several metaphorical plates and it got a little overwhelming. Shortly after I took a small break and came at it from a different angle, got a bunch more ref and continued.


Somewhat of a big leap with the Dreadnought, I am looking at wrapping up the high poly very soon. I am pushing to add more Chaos elements to the front and back whilst trying to maintain a balance and not going too overboard with how much is added. I could spend ages adding and detailing the model, but soon I am going to continue with optimising the low poly and move towards making this game ready.
The overall look I have achieved so far I am happy with. The amount of elements I think read well to give it the Nurgle/Death Guard Aesthetic. Some refinement is needed all over but I shall progress with this as I develop the high poly further.